
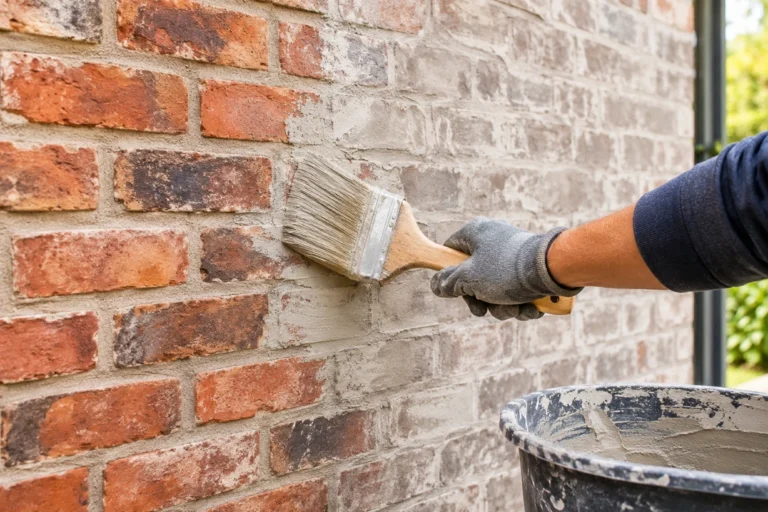
To apply a german smear to brick walls, clean the brick, mix a thick white mortar, dampen the surface, then spread and partially wipe off the mix by hand or with a trowel. Work in small sections, adjust how much brick shows, then let the german smear cure fully.
What Is A German Smear On Brick Walls
When people talk about a german smear on brick, they usually mean a white, rustic coating that softens harsh red tones and makes a wall look old European style. A german smear uses real mortar, not paint. We press a wet mortar mix on the face of the bricks, leave some areas thicker and scrape others thinner so parts of the original brick still peek through.
This makes the brick look cloudy and textured, almost like it aged over many years. Unlike painting, a german smear adds depth and roughness you can feel with your hands. The finish is not flat or glossy. It has character, shadows, and a slightly uneven pattern that changes with the light.
Homeowners choose a german smear because it can calm down strong red or orange brick and blend new and old brick together. Done well, it can make a newer house look like it has been standing for decades. Because we use cement-based mortar, the finish is also tough and can stay in place for many years if the wall is sound.
German Smear vs Whitewash vs Limewash
People often mix up german smear, whitewash, and limewash. The three finishes all make brick lighter, but they use different products and give different looks. Before you learn how to apply german smear to brick walls, it helps to know how it compares to the other options so you can be sure it is what you really want.
A german smear uses thick mortar. It goes on heavy and can hide a lot of the brick if you want. Because it is thick and grainy, it adds strong texture and can round sharp edges on bricks and joints. It also sticks out from the wall a bit, so it feels rough and solid under your fingers.
Whitewash uses thinned latex paint mixed with water. It is lighter, more see through, and smoother than german smear. You can still see the brick shape and most of the joint lines, just toned down. Whitewash is easier to change later. You can repaint over it or clean some off if it is still fresh, but it does not give that heavy old world texture that german smear gives.
Limewash uses slaked lime and water. It soaks into the brick surface and has a chalky matte look. Limewash lets the brick breathe and can be more forgiving on older masonry. It can fade or patina over time. German smear, on the other hand, sits on top of the brick. It feels more like a sculpted layer and changes the profile of the wall itself.
Is Your Brick Wall A Good Candidate For German Smear
Not every brick wall is a good match for a german smear. Before you buy bags of mortar, you need to really look at the condition of the brick and mortar joints. We want a solid base because the new german smear finish depends on the old masonry to stay in place for years.
First, check for damage. If you see bricks that crumble when you press them, large cracks running through the wall, or mortar joints that are missing for long stretches, you should repair those problems before a german smear. If water gets behind the coating in a badly damaged wall, it can cause more problems later.
Second, check how dirty the brick is. Soot, mold, heavy old paint, and oily stains can keep new mortar from sticking. A german smear needs clean, rough brick to bond well. If the wall looks shiny or has flaking paint, you may need to strip or at least power wash the surface and let it dry fully.
Third, think about future changes. A german smear is not easy to remove. Once you coat the brick, going back to bare brick is hard and may damage the surface. If you like your brick but just want a slight change, whitewash might be better. If you hate the color and want a bold, rustic, long term change, german smear makes sense.
Tools And Materials You Need For A German Smear
Applying a german smear to brick walls does not require rare tools, but you should gather what you need before you start. This helps you work in a smooth rhythm, especially because mortar has a limited work time.
For most projects, you will need:
- Type N or Type S premixed mortar or mortar mix you blend with sand
- Clean water in buckets
- Heavy duty drill with mixing paddle or a mixing hoe
- 5 gallon buckets or mixing tubs
- Margin trowel and brick trowel
- Rubber gloves and safety glasses
- Dust mask when mixing german smear mortar
- Large stiff brush and wire brush
- Sponge and clean rags
- Drop cloths, painter tape, and plastic sheeting
- Optional grout bag if you want to pipe mortar in joints
Type N mortar is often best for older bricks because it is a bit softer and less harsh. Type S is stronger and often used for newer brick or exterior foundations. Both can work for german smear if the brick is sound. Many people tint the mortar with white or light gray, but you can also add cement color if you want a cream or beige tone.
How To Prepare Brick Walls For A German Smear
Good prep is half of the job. A clean wall will help your german smear bond well and cure with fewer weak spots. This step is not fun, but skipping it often leads to flaking or uneven color.
Start by clearing the area. Move furniture away from the wall if you are working indoors and cover the floor with drop cloths. Tape plastic over windows, trim, fixtures, and outlets anywhere you do not want mortar to touch. Mortar dust and slurry can scratch glass and stain wood if it dries in place.
Next, scrub the brick. We like to use a stiff brush and mild detergent mixed with water for interior walls. For outdoor walls, you can use a pressure washer on a low to medium setting, holding the nozzle at a gentle angle so you do not gouge the joints. The goal is to remove loose dust, cobwebs, soot, and chalky residue.
Once the wall is clean, inspect the joints. Use a pointing tool to scrape out any loose crumbling mortar and repoint those joints with fresh mix. Let repairs cure as recommended on the bag, usually several days, before you apply a full german smear over the surface.
Just before you spread the german smear, lightly dampen the brick with clean water. The wall should feel cool and just slightly wet, not dripping. This step helps keep the brick from sucking water out of the fresh mortar too fast, which could weaken the bond and cause hairline cracks.
Mixing The Mortar For A German Smear Finish
The consistency of your mortar makes a huge difference to the final look of your german smear. Too thin and it runs down the wall, fills all the joints, and covers more brick than you planned. Too thick and it is hard to spread or wipe back, leaving harsh clumps instead of soft blends.
Most people aim for a texture similar to thick peanut butter or soft frosting. It should hold peaks when you lift the trowel, but still relax a little when you press it on the wall. To get this, start with clean water in your bucket, then add the dry mortar mix slowly, blending with a mixing paddle.
Let the mortar sit for a few minutes, then mix again. This rest time lets the water soak into the cement and sand grains fully, so the german smear mixture stays more stable while you work. Adjust with small amounts of water or dry mix until you are happy with the feel.
If you want white german smear, choose a white mortar or add white cement and sand in the mix. You can also add pigments made for cement to get soft gray, tan, or cream tones. Always mix a small test batch and let it dry on a sample board or spare brick so you can see the true color before you commit to the whole wall.
Step By Step: How To Apply A German Smear To Brick Walls
Once your wall is prepared and your mortar is mixed, you can start the fun part. We suggest working in sections of 3 to 4 square feet at a time. This gives you enough time to spread and adjust the german smear before it begins to harden.
Step 1: Dampen And Protect The Area
Lightly mist the section of brick you plan to work on with clean water. Check again that trim, outlets, plants, and floors are covered. Put on gloves and safety glasses. German smear work is messy, and mortar can be harsh on skin and eyes.
Step 2: Apply Mortar To The Brick Surface
Use a trowel or your gloved hand to scoop mortar and press it onto the brick face and joints. Many people like to use their hands for better control, pressing the german smear into the joints and dragging it across the brick surface in small arcs. Aim to cover the mortar joints fully first, then feather onto the brick faces.
If you want a heavier german smear look, apply a thicker layer and cover more of the brick face. For a lighter, more subtle effect, keep the mortar thin on the brick faces while fully packing the joints.
Step 3: Shape And Smear For Texture
Once the mortar is on the wall, begin to smear it. Drag your trowel or gloved hand sideways and diagonally to blend the new mortar over the bricks. This motion gives the german smear its cloudy, aged look. You can press harder in some areas to let brick edges show and keep other spots thicker to add drama.
Watch your pattern. Try not to repeat the exact same move over and over, or the wall may look too planned. Instead, step back every few minutes, squint your eyes, and look for balanced patches of light and dark.
Step 4: Wipe Back To Reveal Brick
After a few minutes, when the mortar starts to firm but is not fully hard, use a damp sponge, rag, or brush to wipe some of it off the brick faces if you want more color to show. This is how you fine tune the style of your german smear.
For a soft, romantic look, wipe more off the brick centers and leave mortar heavier near the edges. For a more rugged farmhouse style, keep thicker patches and only reveal random brick corners. Always rinse your sponge often so you do not smear sandy slurry over areas you are happy with.
Step 5: Blend Sections As You Move Along
Continue this process, working in sections and slightly overlapping the edges so they blend together. It helps to always end a work day on an inside corner, natural break, or behind a fixture so any small change in color or texture from a new batch of mortar is less visible.
Keep notes on your mortar mix, water ratio, and wiping time. German smear can change look a lot based on tiny details, and a quick note helps you match your finish if you pause the project and come back later.
How Thick Should The German Smear Be
The thickness of your german smear controls both the style and the long term performance. As a general guide, a thin coat around 1/8 inch over the brick faces with fuller joints works for most interior walls. It gives a soft haze without burying the brick shape.
For exterior walls, many people prefer a bit more body, closer to 1/4 inch, especially on rough or uneven brick. Thicker areas on damaged spots can hide flaws and help even out color. Just remember that very thick patches can be more prone to hairline cracks if the wall moves or if the mortar dries too fast.
You do not need perfectly even thickness. Part of the charm of german smear is the changing depth. What matters most is that the mortar bonds firmly where it is thicker and that you do not trap large hollow pockets behind it.
How Long Does German Smear Take To Dry And Cure
Drying and curing are not the same. Your german smear will feel dry to the touch within a day or two in normal indoor conditions. You can usually remove tape and light covers at that point. But the deeper cure of the cement can take several weeks.
For the first 48 hours, protect the wall from strong drafts, direct sun, or heavy rain if the work is outside. Very fast drying can cause shrinkage cracks. If the weather is hot and dry, you may lightly mist the surface with water a few times during the first day to slow the process and support a stronger cure.
After about a week, the german smear reaches most of its strength, though the final hardening and light color changes can continue for a month or more. During this time, avoid scrubbing the surface or hitting it with ladders, heavy tools, or pressure washers.
Common Mistakes When Applying A German Smear
Even careful DIY work can run into trouble. Knowing the most common mistakes helps you avoid frustration and get the german smear finish you pictured.
One mistake is skipping cleaning and prep. Mortar needs a clean, rough surface. Grease, soot, or old sealer will cause peeling or hollow spots. Taking time to scrub and repair joints may not feel exciting, but it saves you from redoing whole sections later.
Another mistake is mixing the mortar too thin. A soupy german smear will run into every crack and may look patchy once dry. It can also dry weaker. Always start thicker and add water slowly while mixing. Test the mix by pressing some against a vertical scrap; it should cling without sliding down.
Many people also over-wipe the surface. If you keep rubbing with a wet sponge for too long, you can polish the mortar, smear fine dust over the bricks, and lose the crisp texture that makes german smear special. Work with a damp, not soaking wet, sponge and stop once you like the balance.
Finally, working on a very hot or windy day outdoors can cause rapid drying. This leads to hairline cracks and weak bonds. Plan outdoor german smear work for mild weather whenever you can, or work in shade and keep the surface slightly damp as it cures.
How To Maintain Brick Walls With German Smear
A german smear finish is fairly low maintenance, but it still needs some basic care. Regular gentle cleaning and smart checks help it last many years and keep its soft, classic look.
For routine cleaning, dust interior walls with a soft brush or vacuum with a brush tool. If you need to clean marks, use a damp cloth and mild soap. Avoid harsh chemicals and abrasive pads that could scratch or stain the mortar.
On exterior walls, rinse with a garden hose once or twice a year to remove dirt and pollen. Do not use high pressure close up, as this can erode the german smear over time. If you see small algae or mildew spots, clean them early with a gentle masonry-safe cleaner and a soft brush.
Check for cracks or flaking once a year. Small hairline cracks are common and often not serious, but if you see pieces of german smear coming loose, tap the area lightly with a tool. Hollow sounds may mean the mortar did not bond well. You can chip loose spots away and patch them with fresh mortar blended to match the existing color.
Should You Hire A Pro Or DIY German Smear
Many homeowners handle an indoor fireplace or accent wall german smear as a DIY project and are happy with the result. The work is more about patience and feel than complex skills. If you enjoy hands-on projects and are willing to practice on a test panel, you can likely learn the motions.
However, for large exterior walls, high surfaces, or historic brick, hiring a mason with german smear experience can be wise. They understand how different bricks react, how to protect nearby surfaces, and how to manage scaffolding and safety. A pro can also suggest variations like partial german smear, where only certain rows or zones are coated to keep more of the original brick visible.
If you are unsure, start small. Try a german smear on a back wall, garden wall, or a test board made with similar brick. Live with it for a few weeks. See how the color dries, how it feels in daily light, and how you feel about the change. This small step can guide your choice before you commit to the front of your house.
Design Ideas And Style Tips Using German Smear
Because german smear softens brick color and adds texture, it fits many styles. You see it on cozy farmhouses, modern cottages, and even some city lofts. A few thoughtful choices will help your new finish fit the rest of your home.
For a light, airy feel, combine white or off-white german smear brick with simple trim, natural wood beams, and clear glass fixtures. This keeps the room bright while the texture adds warmth so it does not feel flat. In living rooms, a german smear fireplace can become the calm focal point that pulls different furniture colors together.
For a more dramatic look, you can use a slightly darker mortar, like warm gray, and leave more of the red brick showing through. This creates a moody, layered effect that pairs well with black metal, deep blue or green cabinets, and rustic floors. On exteriors, this kind of german smear can make a brick house look grounded and timeless.
If you have mixed brick or patched areas from past repairs, german smear is also a helpful way to blend them. The mortar veil softens sharp color changes and makes the wall read as one whole, not a patchwork. This is especially useful on older homes where new brick never quite matches the original color.
Final Thoughts On Choosing German Smear For Brick Walls
Choosing a german smear finish is a strong design move. You are not just painting brick; you are changing its shape, texture, and how light moves across it. When done with care, a german smear can calm loud brick colors, hide years of wear, and give your walls a gentle, hand-worked feel that is hard to copy with simple paint.
Take time to test mixes, study your brick, and plan the level of coverage you want. Work in sections, keep your mortar the right thickness, and step back often to see the full picture. With patience and simple tools, a german smear can turn a standard brick wall into a feature that feels both classic and personal, inside or outside your home.
